
Available from the Essential plan.
A well-prepared file is the key to a successful import. The rules in this article apply to the three import wizards of the Members application: organizations, members and memberships.
In this article
- Before you start
- File format
- Columns and unique identifier
- Dates and numbers
- Choice fields and checkboxes
Before you start
- Create your fields. Only fields that exist in your forms can be imported (see Guide | Create and manage your forms).
- Set up your membership types if you are importing memberships.
- Create your custom groups if you are importing them (see Create Custom Groups).
- Import in the right order: organizations first, then members, then membership history. Each import relies on the records created by the previous one.
An import saves data: it does not trigger any action. No receipt, automatic communication or accounting entry is generated for imported members and memberships.
File format
The wizard accepts an Excel file (.xlsx) or a CSV file (.csv) that uses a semicolon (;) as the separator. You can use any file, including an export from another software, or start from the template provided by the wizard: click Download my Excel template at the first step.
- Only the first tab of the file is imported.
- Keep the file simple: no formatting (colours, borders, highlighting), no merged cells, no macros.
- The first row contains the column titles, followed by one row per item to import.
- Delete empty rows at the end of the file: they could create empty records.
If in doubt, select the data to import and copy it into a new file with Excel's Paste Values function. You will get a file that contains only your data.
Columns and unique identifier
Column names do not need to match field names: you match each column to a field during the import. A column that is not matched to any field is ignored.
Include a column that identifies each record uniquely, such as the email or the member number. The wizard uses it to decide whether to update an existing record or create a new one. A mistyped value in this column creates a duplicate.
Dates and numbers
Two date formats are accepted:
- a cell in Excel's Date format, whatever its display format;
- text in the YYYY-MM-DD format, with the zeros (for example, 2026-04-03 for April 3, 2026).
Other formats, such as 03/04/2026 or 2026-4-3, are rejected: the Validation step displays the message The date format doesn't match and the date is not imported. For example, in the members import, the member is imported without their membership. Check the whole column before importing, especially in a CSV file or an export from another software.
For the expiration date of a membership, enter the last day of validity: this is the date that will then be displayed on the membership. An optional date left empty is ignored.
To update members based on their number, use exactly the same format as in Yapla: 0001 is different from 1. Set the column to the Text format in Excel to keep leading zeros (see Generating membership numbers).
Choice fields and checkboxes
For a field with answer choices (drop-down list, radio buttons, checkboxes, country, language, etc.), enter either the exact label of the choice or its ID in the file. Upper and lower case do not matter. At the Mapping step, then indicate whether the column contains Text or ID values.
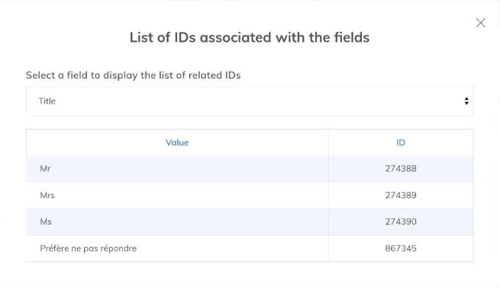
To find the IDs, click Access the IDs associated with the fields at the first step of the wizard, then select the field. A table displays each value and its ID.
- Several answers: enter them in the same cell, separated by a comma. If a label itself contains a comma, use the IDs.
- Single checkbox (for example, an acceptance box): enter 1 to check it.