
Available with the Essentials plan and higher. Access restriction by group is available with the Plus plan and higher.
Each zone of a page on your website has settings that do not depend on the selected module: its name, its visibility, its title and, for pages linked to a master page, the option to customize it. They appear in the Content of the area section, at the top of the configuration window of each zone. This article presents them, along with the detail page shared by the article modules.
In this article
- Choose and remove the module of a zone
- Add a title above the module
- Limit the visibility of a zone
- Customize a zone coming from the master page
- Choose the detail page of articles
To open the configuration window of a zone, see the article List of modules in the Website feature.
Choose and remove the module of a zone
- Zone name: identifier of the zone in the page structure. An explicit name ("Banner", "Right column") helps you find your way when you work on your pages. The name is edited in the Structure tab of the page.
- Feature: source of the content displayed by the module: Website, Members, Events, Donations, Contacts, Store or Data. Ask yourself the following question: what should this zone display? For an event, choose Events; for a donation campaign, choose Donations; for written content, choose Website.
- Zone module: module that displays the content. A short description of the selected module appears under the list.
- Empty the area: removes the module from the zone.
Add a title above the module
- Title: text displayed above the module. Leave the field empty if the displayed content already includes a title.
- Style: level of the title, from Title 1 to Title 6. Respect the hierarchy of the page: a single Title 1 per page, then Title 2 for sections. This structure makes the page easier to read and helps search engine optimization.
Limit the visibility of a zone
The Visibility section reserves the content of a zone for certain visitors. The page remains accessible to everyone, but the zone is displayed only to the people concerned.
- Limit access to this area depending on whether the user is logged in or not: then choose one of the following options:
- Limit access to logged in users: the zone is displayed only to people logged in to your website, for example for content reserved for members.
- Limit access to users who are not logged in: the zone is displayed only to visitors who are not logged in, for example for an invitation to become a member.
- Limit access according to user groups: the zone is displayed only to logged-in people who belong to the groups selected in Associated groups. See the article Create Custom Groups.
Combine two zones to adapt a page to each visitor: a zone reserved for visitors who are not logged in that invites them to join, and a zone reserved for logged-in people that presents the exclusive content.
To restrict an entire page rather than a zone, see the article Restrict access to a page or section of your website.
Customize a zone coming from the master page
When a page is linked to a master page, the zones configured in the master page (header, menu, footer, etc.) are automatically displayed on the page. In the configuration window of these zones, only the Personalize this zone option appears.
- Box unchecked: the zone displays the content defined in the master page. Any change to the master page applies to it.
- Box checked: the zone becomes specific to this page. Choose and configure a module as for a regular zone. Later changes to this zone in the master page no longer apply to this page.
Do not delete a zone in the master page to remove it from a single page: the deletion erases the content of this zone on every page of the website. Remove the content from the page concerned instead.
To learn more, see the article How the master pages work.
Choose the detail page of articles
The Featured articles and Multiple articles modules display article previews. When a visitor clicks a preview, the full content of the article is displayed in a detail page. The Details page field, in the Call to action section of these modules, determines where it is displayed:
- No redirect: the article is displayed in the module itself, in place of the list, with the layout of the current page.
- A page of your website: the article opens in the selected page. This page can contain a Multiple articles module, or a Single article module used as a container.
Create a custom detail page (container mode)
Container mode lets you design a custom detail page, with the layout of your choice: banner, sidebar, form, etc. A single container page serves all the articles in the list.
- Create a page, for example News detail, and check Don't display this page in your web site menu.
- In the Edit tab of this page, click the main zone, select the Website feature, then the Single article module.
- Check Use as a container. The Category and News fields disappear: the module will display the article chosen by the visitor.
- In Elements on detail view, check the elements to display (title, date, image, article, etc.), then click Save and close.
- Open the page that contains the list of articles (Multiple articles or Featured articles module). In the Call to action section of the module, select the container page in the Details page field, then save.
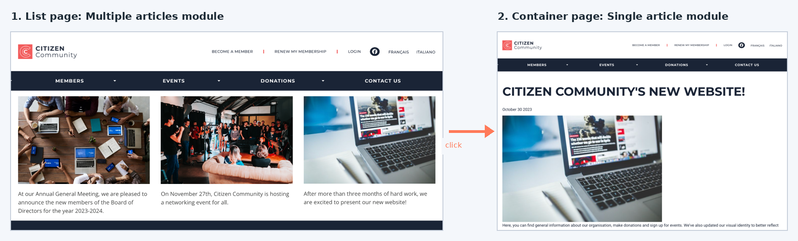
When a visitor clicks an article in the list, they land on the container page, whose address ends with the title of the article, for example /detail-nouvelle/title-of-the-news-item.
The container page appears in the Details page list as soon as its Single article module in container mode is saved.