
Creating a subscription form for your newsletter lets you collect the contact information of your members or prospects so you can send them targeted communications. You can customize the form fields to gather the information you want about the person subscribing. Once it is set up, the form can be embedded on your website or shared through a direct link.
In this article:
- Create a subscription form for your newsletters
- Setting up double opt-in on your form (or not) and its benefits
- Embed your form on your website with a link or code
- Set up and customize the confirmation email (opt-in)
- Good to know
Create a subscription form for your newsletters
The Yapla Newsletters Free plan includes 1 form. The Growth and Premium plans let you create an unlimited number of forms.
- In Yapla Newsletters, go to Audience Building > Forms, then click the (+) in the top right corner.
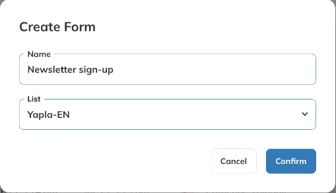
- Name your form, then choose the contact list you want to link to this form. Click Confirm.
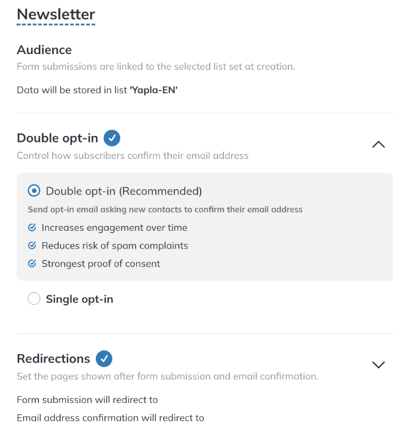
- The form setup page opens. In the Double opt-in section, choose the subscription method with or without a confirmation email (consent): Double opt-in (Recommended) or Single opt-in.
You can then edit the form to add a description or fields, or to change the button names.
- Click Edit Form, above the form preview.
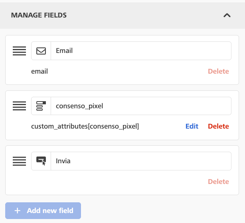
- Click the form in the preview to display its properties. In the MANAGE FIELDS section of the right-hand panel, rename a field directly in its box, click Edit to change a custom field, Delete to remove it, or Add new field to add one. Then click Save.
- Back on the form page, click Publish to put your changes online.
Changes saved in the editor are only visible on the live form once the form has been published.
Setting up double opt-in on your form (or not) and its benefits
Before you choose, note that double opt-in is a recommended method that ensures better-quality contact lists by adding a confirmation step at sign-up. When a user subscribes through a form, they receive a confirmation email containing a link they must click to confirm their consent. This process checks that the email address is valid and makes sure the user is genuinely interested.
Benefits:
- List quality: Eliminates typing errors and reduces invalid addresses.
- Higher engagement: Confirmed users are more likely to interact with your campaigns.
- Regulatory compliance: Helps you comply with data protection laws such as the GDPR and CAN-SPAM.
Single opt-in, on the other hand, lets your members subscribe to your newsletters without having to confirm their address.
Embed your form on your website with a link or code
Once your form is set up, you can embed it on your website either with a button that redirects to the subscription form URL (external window), or with HTML code that you add to your website to display the form directly on the page you want.
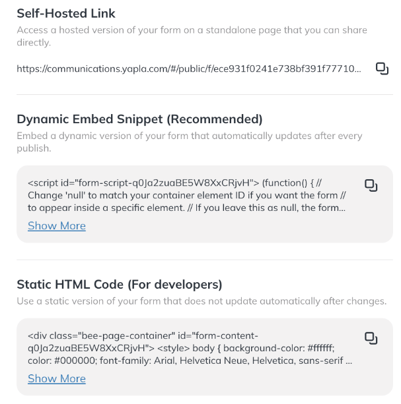
The embedding options are on the form setup page, under Audience Building > Forms (open the form from the list). Copy the element you want with the copy icon to its right:
- Self-Hosted Link: the URL of a standalone page that displays your form. Assign it to a button wherever you want on your website, or share it directly.
- Dynamic Embed Snippet (Recommended): the code to paste wherever you want on a page of your website. This version updates automatically every time the form is published.
- Static HTML Code (For developers): a static version of the form that does not update automatically after changes.
Change the subscription confirmation page
To change the subscription confirmation page of a form, you can add a URL that points to a custom page on your website.
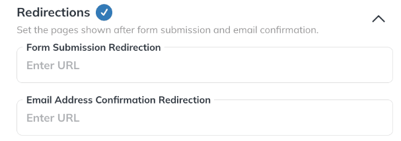
On the form setup page, open the Redirections section and enter the URL you want in Form Submission Redirection (page displayed after the form is submitted) or in Email Address Confirmation Redirection (page displayed after the confirmation link is clicked).
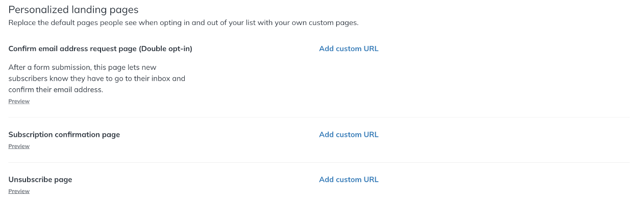
The default pages for an entire list can also be customized under Audience > Contacts: click the gear icon in the top right, open the Settings tab, then click Add custom URL to the right of Confirm email address request page (Double opt-in), Subscription confirmation page or Unsubscribe page.
Set up and customize the confirmation email (opt-in)
The confirmation email (opt-in) is the message sent automatically when someone subscribes through a double opt-in form. It confirms the subscriber's consent, keeps your list clean and protects your deliverability. You choose the email sent for each language, its sender and its design.
Assign a sender to each confirmation email
The Audience Building > Opt-In Emails page lists the confirmation emails in your account, with the sender and language of each one. Each language uses its own confirmation email, and each one must have a sender set up.

If no sender is set up, the confirmation email cannot be sent: new subscribers are then never confirmed or added to your list.
- Go to Audience Building > Opt-In Emails, then click Edit to the right of the email to set up, or click the (+) in the top right to add one.
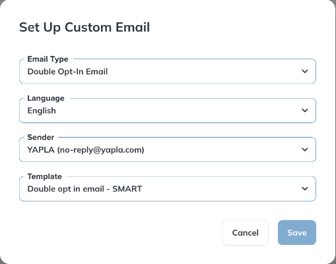
- In the Set Up Custom Email window, fill in the fields:
- Email Type: Double Opt-In Email.
- Language: the language this email applies to, for example English.
- Sender: the verified sender the email is sent from.
- Template: the template used for this email, for example Double opt in email - SMART.
- Click Save.
A list's default sender and language are set under Audience > Contacts: click the gear icon, then open the Settings tab (Default sender and Default language sections).
Customize the confirmation email template
The Template field determines what your confirmation email looks like. To go beyond the default template, create your own version.
Always start from an existing double opt-in template. Never start from a blank template or a regular campaign template: double opt-in templates contain tags linked to your account credentials, and a template that is not based on one cannot be used as a confirmation email.
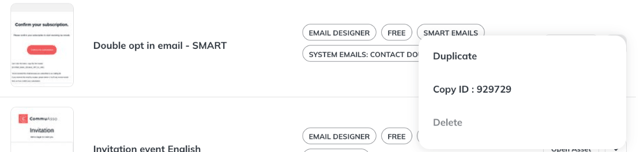
- Go to Resources > My Email Templates, then select All Templates from the drop-down menu in the top right. Double opt-in templates have the SYSTEM EMAILS: CONTACT DOUBLE OPT_IN tag.
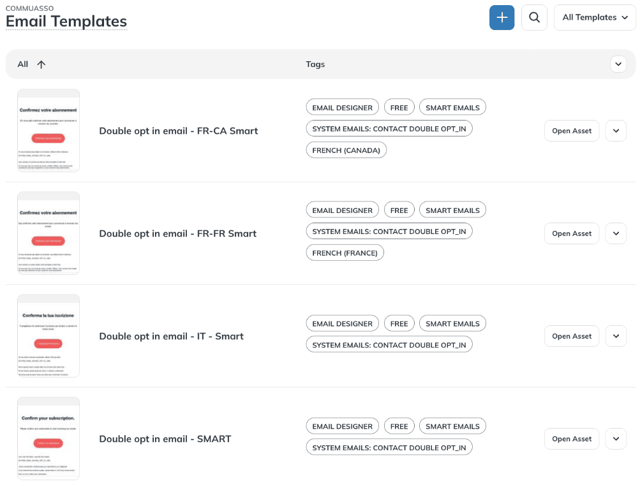
- On the row of the starting template (for example Double opt in email - SMART), click the arrow to the right of Open Asset, then click Duplicate. Then work on the copy: duplicating carries over the tags linked to your account credentials.
- Adapt the text and design of the copy to your organization. The colours defined under Settings > Brand Kit apply, so it stays consistent with your other campaigns.
- State clearly what the person is subscribing to, so they recognize the request and confirm with confidence.
- Leave all the tags in place, especially the confirmation link (see the warning below).
- Then go to Audience Building > Opt-In Emails, select your custom template in the Template field of the email for the language concerned and click Save.
For a double opt-in email, always keep the [SYSTEM_EMAIL_DOUBLE_OPT_IN_LINK] tag exactly as it is. This tag generates the link the subscriber clicks to confirm their subscription: if it is missing, deleted or changed, the confirmation fails and new contacts are not added to your list.
Troubleshooting
- The template cannot be used as a confirmation email: the template must be based on an existing double opt-in template. Duplicate a double opt-in template and make your changes again on the copy.
- The confirmation email does not confirm subscribers: check that the
[SYSTEM_EMAIL_DOUBLE_OPT_IN_LINK]tag is still present and unchanged, that the right template is selected for this language and that the sender is verified and authenticated. - The email is sent in the wrong language: set up a confirmation email for each language your contacts use. The contact's language determines which email they receive.
Good to know
We also recommend using the Data tool in Yapla to create a subscription form for your newsletter, since this method centralizes subscribers directly in your Yapla database, giving you more control and more customization options. Unlike a form created in Yapla Newsletters, this alternative lets you personalize the communications you send, since subscribers are automatically added to the Contacts section of Yapla, synced with the newsletter and added to a dedicated system group, which makes them easier to manage and segment. For more details, see our article on creating a contact form with Data.