In Yapla, forms are records used to collect information about your members, participants, or donors. Each record contains fields that you can customize according to your needs. These forms are completed by the users (members, participants, or donors). Forms are also used to define the information visible in the Yapla account for administrators.
In this article:
- Form-related features
- Create or edit a form
- Advanced form customization
- Environments and contexts
- FAQ
Form-related features
All Yapla features that collect information allow you to create forms. You can create forms for:
- Members: members, organizations or family
- Events: participants (and registration managers), speakers (Premium feature)
- Activities: participants
- Sessions: participants
- Donations: donors, p2p campaign participants, p2p campaign teams
- Data: object items
- Contacts: contacts, organizations
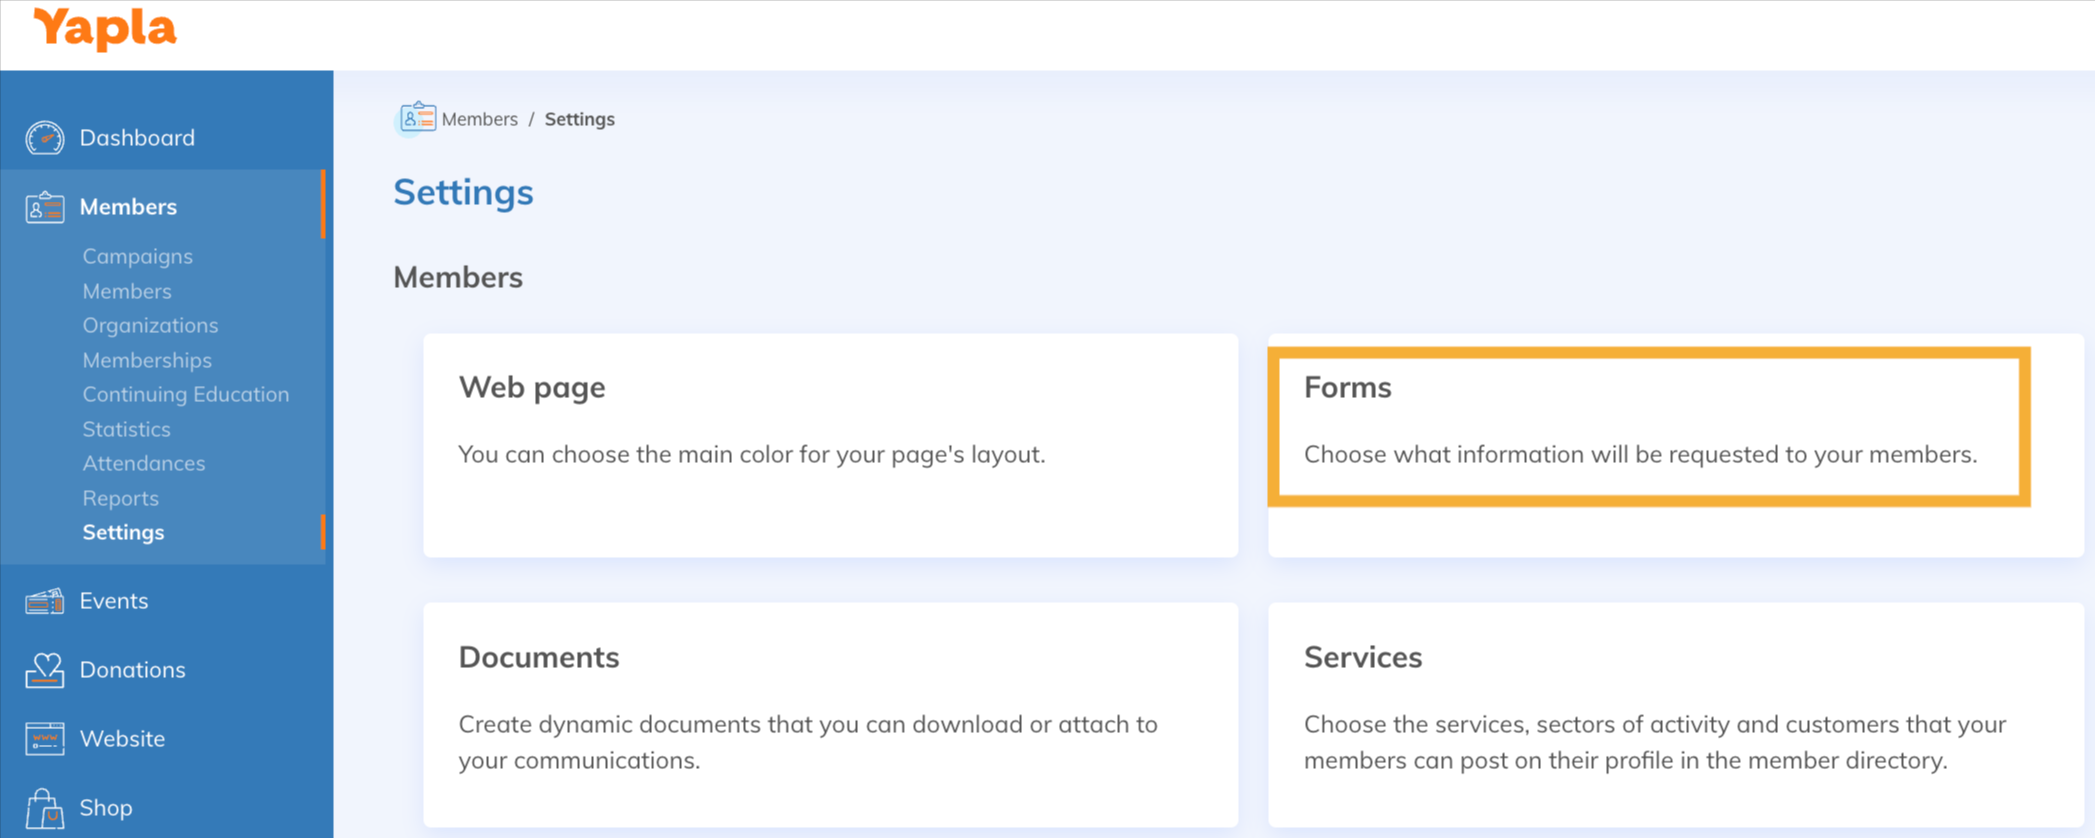
Where to configure forms
Go to the relevant feature (e.g., Members), then click on Settings > Form.
Note: For simplified membership campaigns, go to Members > Campaigns > select your campaign > Forms.
This page gives you access to the list of fields and forms. You can edit them here.
Create or edit a form
Click on Settings, then Forms. Choose a form or click on + Add a form. Give your form a name. If it is linked to a group, you can add it.
Note: For simplified membership campaigns, go to Members > Campaigns > select your campaign > Forms.
Form editor
Add a field – select an existing field from the list of fields on the left, then drag it to the desired location in the form.
Important: see FAQ regarding the Country and Province fields.
Create a custom field – click on + Create a new field, select the desired field type from the list, then click on Next. Complete the next page to properly configure your field.
- About the technical name: This is the database name of the field, automatically generated from the entered name (without spaces or special characters) and only editable upon creation. It is invisible to users and is used for proper account functionality, generating dynamic keywords, and, in some cases, synchronizing data between features (e.g., pre-filling a registration form for a participant who has already filled out a form in the past: technical names must be identical and fields must be of the same type. Multiple-choice fields cannot be synchronized).
Make a field mandatory – when creating a custom field, check the Required response option. Otherwise, click on ... to the right of the desired field, then on Field properties. Check Required response. To override the required field setting for this form only, click on Field display and check Ignore the Required field option.
Avoid duplicate entries – when creating a custom field, check the Do not allow duplicates among all items option. Otherwise, click on ... to the right of the desired field, then on Field properties. Check Do not allow duplicates among all items. This option is useful for avoiding duplicate registrations, for example.
Create a new section – click on + Add a section. Give it a name and description if needed. Select and drag the desired fields into it. It is possible to make this section visible to administrators only by checking the Show this section only for administrators box.
Change fields order – click and drag to the desired order or section.
Delete a field – click on ... to the right of the field, then on Remove. You can also click and drag the field back into the field bank to remove it from the form.
Customize the display of a field - click on ... and then on Behaviour of the field, and select the desired options to customize the field's appearance.
-
Read-only (no editing possible)
-
Ignore the option required field
-
Show description (allows for different display options for the field description)
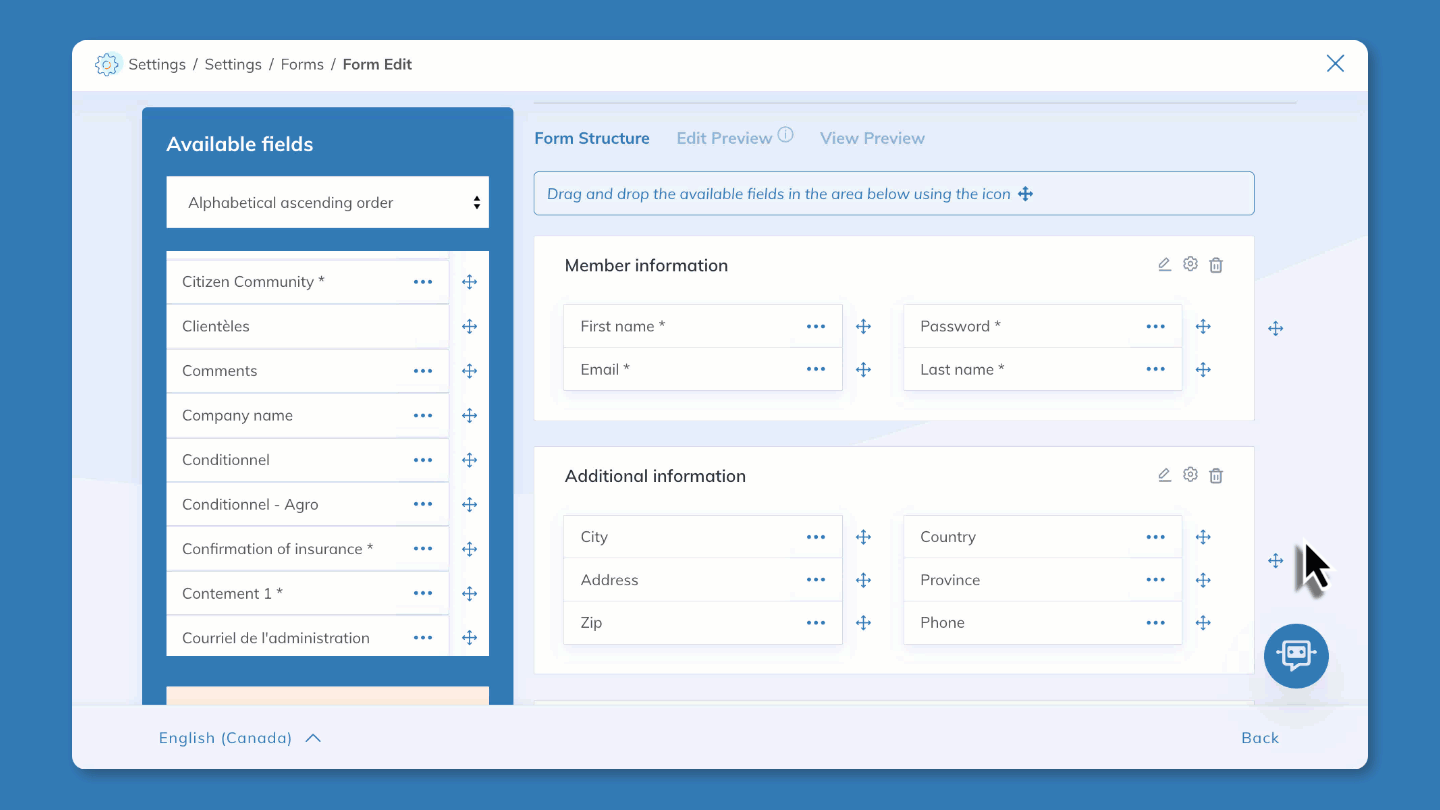
Preview and test your form
In the form editor, three tabs are available to help you preview and test your form:
- Form structure: add and modify fields.
- Edit preview: test the form as it will appear when filling it out.
- View preview: display the form as it will appear in view mode.
Advanced form customization
Manage your custom fields

If you have created custom fields in one or more forms and want to view or modify them quickly, go to the form list in any feature, then click on the Fields sub-tab.
This sub-tab contains all the custom fields created across all your forms. Note that it is not possible to change the type of already created field. You can also create new fields from this page by clicking on + Add a field.
When creating a new Yapla account, the system automatically creates native (default) fields. These fields collect basic information and cannot be removed. Native fields may vary depending on the country associated with your Yapla account. Here is the list of native fields.
Below is an overview of the types of fields available by default and the settings for creating a custom field:
Types of fields available by default
| Checkbox | Allows users to respond affirmatively (checked box) or negatively (unchecked box). This type of field only allows the creation of a single checkbox. |
| Consent | Displays a checkbox in your form. When it is checked, the date and IP address of the user who checked it are recorded. |
| Date | Allows users to enter or select a date from a calendar displayed in a pop-up window. An option also allows time management to be enabled. |
| Image | Allows users to upload an image. |
| Allows users to enter an email address, which is verified to ensure a correct format. | |
| Drop-down list | Allows users to select a value from a list that you can define. |
| Single choice (radio) | Allows users to choose only one answer from the options provided. |
| Multiple choice (checkboxes) | Allows users to choose several answers from the options provided. The Enable autocomplete function allows the person to type their choices manually, rather than checking each box. |
| Object | Allows users to see the association linked to the instance of the object. |
| Password | Allows users to enter a password. |
| Phone | Allows users to enter any phone number. Formatting is automatically applied based on the country. |
| Text | Allows users to enter any combination of letters and numbers. |
| Address | Allows users to enter an address. |
| URL | Allows users to enter any valid website address. When users click on the value entered in this field, the URL then opens in a separate browser window. |
| Text area | Allows users to enter up to 32,000 characters over multiple lines. |
Custom field creation settings
| Fields | Application | Explanation |
|---|---|---|
| Field name | All | Label of the field. It can be modified at any time. This label is used by Yapla forms. |
| Technical name | All | Technical name of the field. This name cannot be modified after the field is created. |
| Description | All | Description of the field. |
| Required | All | Allows you to make a field mandatory. |
| Character limit | Text | Allows you to define the maximum number of characters for the field. |
| Validation | All | Allows you to define a validation rule for the field. |
| Normalization | All |
Allows you to define a format applied to all responses:
|
| Default value | All | Allows you to define the default value of a field. |
Advanced field types: for the Members feature
| Membership type | Allows you to display the membership type. Does not allow you to modify a member's membership type. |
| Password | Allows users to enter a password for a member. |
| Member status | The current status of the member. |
Create dynamic forms
It is possible to make your forms dynamic to gain more flexibility in your questions. Show or hide additional fields or sections depending on the answers provided. To learn more about creating dynamic forms, see this article.
Special Considerations for the Date Field
- Display age instead of date of birth – When creating a new Date-type field, check the Treat as the date of birth box. In the Display options field, choose to display the information as a date, age, or both.
- Add criteria to the date – it is possible to add a start date and an end date. This allows you to select a date within this range. If the user selects a date outside of this range, an error message will appear.
-
Add a dynamic Date field – In some cases, it may be necessary to enter a follow-up date visible in administration only. For example, when registering a new member, it is possible to have a field that dynamically displays, based on the date of their registration and a follow-up date for this member.

When creating a Date-type field, check Default value. The current date corresponds to the date when the form is filled out. Add the number of additional days required before the follow-up or a specific date. Once the field is created and added to the form, click on ... then on Read-only.
Translate Form Labels
If you have a bilingual site, you can translate the form labels. In the list of forms, click on the gear icon to the right of each form, then on Translate.

The Translate function opens the language management system. Learn how to manage translations in Yapla.
Environments and Contexts
It is possible to display different forms depending on the environment or application context. Once in the list of forms, go to the Contexts sub-tab.
Environments
Two environments allow you to display the forms of your choice. You can, for example, create a form with limited fields for your website and a more complex form, with additional fields used only for internal management.
The environments are:
- Yapla – corresponds to the dashboard of your Yapla account. Only administrators have access to it.
- Website – corresponds to what visitors see. This is where the forms they can fill out are displayed.
Contexts
A context corresponds to the application or usage context of the form. For example, the context Member details in the public directory correspond to the place on your website where it is possible to view the details of a member in a directory. The selected form will display the previously filled data from this form. Therefore, it would be appropriate to choose a form that does not contain the member's home address, for example.
The case of administration notes – another example of using contexts is the ability to add administration notes, visible only to administrators, in member forms. Contexts allow you to create two forms, one containing an administration note field that will be linked to the context Member editing in the Yapla environment. It will, therefore, be exclusive to administrators.
By default, the same form is applied to all usage contexts. Not all contexts necessarily apply to your use of Yapla or your website. However, it is easy to adapt them to your needs. Each feature has different contexts. You can find them under the main tab of each feature > Settings > Forms > Contexts.

Examples of contexts related to the forms of the Members feature.
First, make sure your form is created. Under each usage context, select a form from those created in the corresponding feature, then save. The same form can be associated with more than one context and you can modify the forms linked to contexts at any time.
Contexts available by features and environment:
Website |
|
|---|---|
| Adding a new member | Form applied during the registration step of the Become a member process in the Member Area module on a website page. This form will therefore be displayed when registering a new member via your website. |
| Member Editing | Applies when a logged-in member views their profile in their Member Area. In your form configuration, you can choose which fields are read-only and which fields are editable. This form therefore allows the member to update the information in their member’s record through the editable fields. It also appears when an organization manager views a member who is part of their organization. |
| Member details in the private directory |
Applies when a logged-in member views another member's record from the members directory in their Member Area. The private directory displays all active members of the association. This directory is private, as it is only available to members logged in through the Member Area. |
| Adding a member by an organization administrator | An organization administrator can add a member to their organization via the My organization menu in their Member Area. Once the manager clicks on Add a member, the new member addition process begins and the form associated with this context will be displayed at the registration step. |
| Member details in the public directory |
The form defined for the Member details context in the public directory is displayed during searches in the Member Directory module of your website. In addition to the global usage contexts applicable to all public directories, you can define a specific context for a given directory. |
| Membership renewal |
The form associated with the Renewal context of a member's membership is displayed when a member renews their own membership from the My memberships section of their Member Area. This form will be displayed at the registration step of the membership renewal process. |
Yapla |
|
| Adding a member | The form associated with adding a member is displayed when you add a member to your association directly from the Members feature. |
| Member editing | The form associated with member editing is displayed when you modify the record of an existing member. |
| Member viewing | The form associated with member viewing corresponds to the fields displayed on a member's record. |
| Membership renewal | The form associated with renewing a member's membership in administration |
| Side panel | Allows you to view detailed information about a member selected from the list. |
Website |
|
| Participant registration |
|
| Simplified registration for additional participants | Context used only if the simplified registration form for additional participants option is enabled – it applies starting from participant number 2. |
Yapla |
|
| Adding a new registration | Context used when adding a participant. |
| Editing a registration | Context used when editing a participant’s record. |
| Viewing a registration | Context used when viewing a participant’s record. By clicking edit, the Editing a registration context applies. |
| Side panel | Allows you to view detailed information about a participant selected from the list. |
|
Note regarding Registration manager mode and simplified registration forms for additional participants. Here is a scenario to understand which forms are displayed on your site when registration manager mode is enabled as well as the simplified registration form option for additional participants. To learn more about the forms related to different rates for additional participants, see this article.
|
|
Website |
|
| Add a donor | Context used when adding a donor. |
| Edit a donor | Context used when editing a donor’s record. |
| View a donor | Context used when viewing a donor’s record. By clicking edit, the Edit a donor context applies. |
Yapla |
|
| Add a donor | Context used when adding a donor. |
| Edit a donor | Context used when editing a donor’s record. |
| View a donor | Context used when viewing the donor’s record. |
| Side panel | Allows you to view detailed information about a donor selected from the list. |
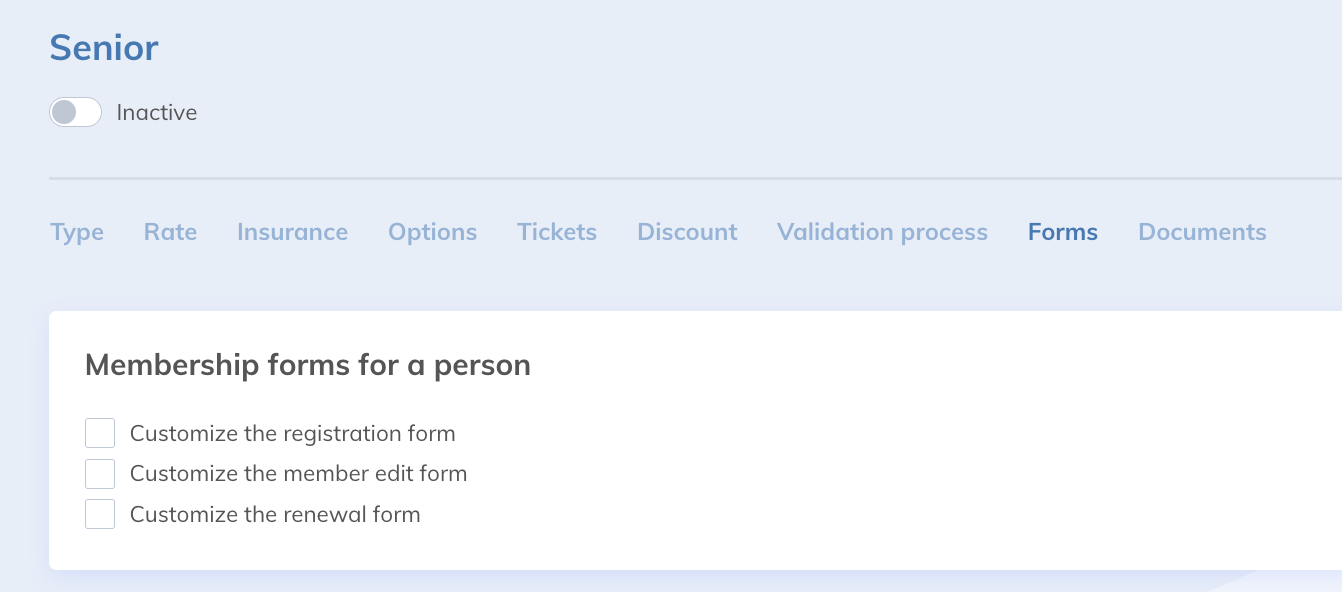
Customize the form for a membership type
You can assign specific forms at the membership type level as well as for their registration and renewal. Assigning forms to these contexts is done in the membership type settings and not in the Context sub-tab. Go to Members > Settings > Membership Types > select the desired membership > Forms.
Specify the form you want to use for the registration process, member editing, or renewal.
FAQ
How can I add a field for users to upload a document? (Medical certificate, ID card, photos, etc.)
To add a field that allows uploading a file, create a new field, then select the File field type, name it, and insert your new field into your form.
How to add a document for review and a checkbox to accept terms and conditions, for example?
To learn more about how to add a document for review linked to a checkbox, see this article.
Which fields are available depending on the features?
Form fields vary depending on the features. To help you find your way around, check out this article: List of native fields for different features .
The Province field does not allow selection. Why?
The native Province field displays the provinces or regions available according to the selected country (for example, states in the United States or provinces in Canada). For it to work, it is essential to use the native Country field in your form.
If you use a custom field to indicate the country, the Province field will not be able to offer the appropriate choices. If there is an issue, check that the Country field used is indeed the default native field available in the list of fields.